Cracking Open a Smith & Wesson
I have often been asked to demonstrate/illustrate how to open up and clean a Smith & Wesson revolver. My policy has always been to avoid those questions. The risk of giving somebody just enough information to make a gun dangerous is extremely high. Also, some of my own technique is contrary to conventional wisdom. Still, being one who advocates buying used, older revolvers, I would be remiss if I did not pass out a bit of information. So, here are my thoughts on the subject of cracking open a Smith and Wesson revolver:
1. Know your limitations.
The lockwork of a Smith & Wesson revolver is not particularly delicate, although there are a couple of small springs that can pop out at inopportune times for the uninitiated. The tolerances of a S&W are precise, however. Disassembly and reassembly requires an eye that has a bit of mechanical aptitude, and a mind grounded in common sense. If you are unable to jump start your car, or you cannot figure out how to plunger a toilet, then disassembling a S&W is not your game. On the other hand, if you are a professional watchmaker, you will pick it up with no problem. Most of us lie somewhere in between. My own experience is a mechanical aptitude that ranges from Model T speedsters to F-18 fighter jets. I am a self taught wrench turner who knows to watch how things come apart, and when to go to the manual. That is enough, as long as the proper checks are performed before firing the weapon again.
2. Get the right tools.
Do not try to open up your Smith with Grandpa's old twenty-nine cent screwdriver and Granny's butterknife. Buy the proper tools. The proper tools include at the minimum, a small set of gunsmith screwdrivers, of high quality sized for Smith & Wesson revolvers. Do not skinch on these. When the bits become worn, buy new ones. You will also need a small brass hammer. If you are unwilling to invest in the proper tools, then you are unwilling to do the job right.
3. Get the right information.
Do not rely on what the gun counter commando tells you. As soon as they say "Just pry the sideplate off" you know they are full of hog manure. Buy Jerry Kuhnhausen's The S & W Revolver: A Shop Manual. Cruise the various gunsmithing forums and listen to what the old established posters have to say. If the information conflicts with Jerry K, then eschew it. If it sounds like a non-damaging or reversible trick, give it a try.
4. Get cheap practice.
Purchase a beater revolver to be your first sacrificial lamb. Buy the ugliest, cheapest S&W you can find that still has a functional trigger and hammer. Learn on it. Do not start out on your three and a half inch Model 27. If you do, do not blame me for the results!
Now...... Here are a few of my tricks I have learned along the way.......
Have a proper workspace. A gunsmithing table is nice, but I have learned that such a wonderful space quickly becomes cluttered in my world. Thus, I purchased a large wooden cutting board to function as a workspace on any counter or table I choose.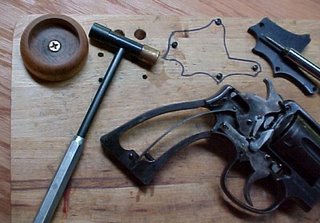 I attached rubber feet to it's underside to keep it from skidding, I drilled holes in it to allow me to punch out pins and to keep screws in order. In fact, I have an area with a diagram of a S&W sideplate with the screw pattern drilled, so I do not mix up yoke screws with the other screws. I have also attached a small wooden bowl to hold small springs, pins and such while I work.
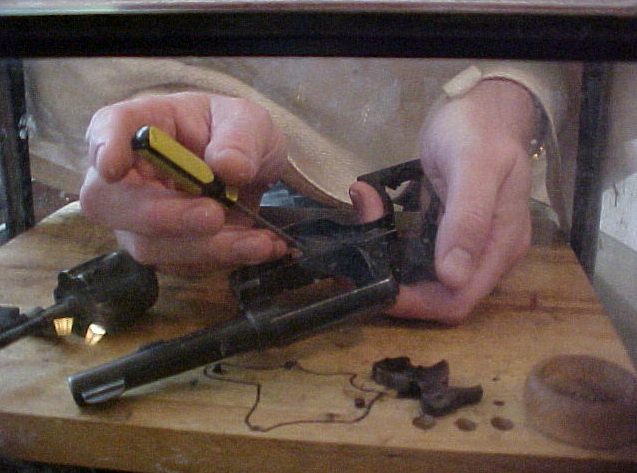
Have a disassembly box. Nothing wastes time like trying to find a miniscule spring that leaped across the room, let alone not even knowing what happened and wondering why your gun doesn't work anymore! For disassembly I use a ten gallon acrylic aquarium turned on it's side with a cloth over it's opening. I simply place the gun inside, drop the cloth over my hands, and voila! When the spring pops out, it is caught.
Move slowly. Watch how things come apart. Remove the hammer and trigger assemblies as complete assemblies. Do not disassemble them outside of your disassembly box! If you have a digital camera, you may want to take a few photographs along the way. Get sufficient light. If necessary, buy a clamp on spotlight. If you cannot see what you are doing, you will screw it up!
Remove gunk and rust by cleaning with a solvent such as Varasol, CLP, or brake cleaner. Many, many problems are caused by gunk. A soak and a nylon brush usually work wonders. If you use a spray can, wear eye protection. Do not remove metal. As in medicine, the first rule is do no harm. It is OK to use a bit of steel wool or a sharpened copper penny to scrape away stubborn rust. Copper ScotchBrite works well too. At times, I will put a bit of steel wool or a sharp piece of copper in a pair of hemostats to get into tight recesses. Keep ammonia based solvents away from nickel finishes.
It is not OK to start stoning sears. Stoning a S&W sear is a quick way to buying new parts. Be wary of case hardened parts. The case hardening is a thin layer of hardened surface. Softer metal lies underneath. I am a believer in lubrication in the right place. It is true that oil attracts dust that over time turns to gunk. The inside of a S&W revolver is pretty well protected though. The problem comes from people spraying lubricants into the gun without disassembly, creating a pathway for the dust to migrate inside the gun. Placing a dab of oil on the hammer and trigger stud before reassembly does not have the same effect, nor does a small dollop of grease on the sear.
Most problems with a Smith & Wesson revolver are caused by one of three things.
1. Rust/gunk in the lockwork.
2. A blow to part of the gun.
3. An uneducated person entering the lockwork.
If you want to prevent number three and take care of number one, then you must get the right information, the right tools, and go about things in a methodical manner to minimize error.
1. Know your limitations.
The lockwork of a Smith & Wesson revolver is not particularly delicate, although there are a couple of small springs that can pop out at inopportune times for the uninitiated. The tolerances of a S&W are precise, however. Disassembly and reassembly requires an eye that has a bit of mechanical aptitude, and a mind grounded in common sense. If you are unable to jump start your car, or you cannot figure out how to plunger a toilet, then disassembling a S&W is not your game. On the other hand, if you are a professional watchmaker, you will pick it up with no problem. Most of us lie somewhere in between. My own experience is a mechanical aptitude that ranges from Model T speedsters to F-18 fighter jets. I am a self taught wrench turner who knows to watch how things come apart, and when to go to the manual. That is enough, as long as the proper checks are performed before firing the weapon again.
2. Get the right tools.
Do not try to open up your Smith with Grandpa's old twenty-nine cent screwdriver and Granny's butterknife. Buy the proper tools. The proper tools include at the minimum, a small set of gunsmith screwdrivers, of high quality sized for Smith & Wesson revolvers. Do not skinch on these. When the bits become worn, buy new ones.
 You will also need a small brass hammer. If you are unwilling to invest in the proper tools, then you are unwilling to do the job right.
3. Get the right information.
Do not rely on what the gun counter commando tells you. As soon as they say "Just pry the sideplate off" you know they are full of hog manure. Buy Jerry Kuhnhausen's The S & W Revolver: A Shop Manual. Cruise the various gunsmithing forums and listen to what the old established posters have to say. If the information conflicts with Jerry K, then eschew it. If it sounds like a non-damaging or reversible trick, give it a try.
4. Get cheap practice.
Purchase a beater revolver to be your first sacrificial lamb. Buy the ugliest, cheapest S&W you can find that still has a functional trigger and hammer. Learn on it. Do not start out on your three and a half inch Model 27. If you do, do not blame me for the results!
Now...... Here are a few of my tricks I have learned along the way.......
Have a proper workspace. A gunsmithing table is nice, but I have learned that such a wonderful space quickly becomes cluttered in my world. Thus, I purchased a large wooden cutting board to function as a workspace on any counter or table I choose.
 I attached rubber feet to it's underside to keep it from skidding, I drilled holes in it to allow me to punch out pins and to keep screws in order. In fact, I have an area with a diagram of a S&W sideplate with the screw pattern drilled, so I do not mix up yoke screws with the other screws. I have also attached a small wooden bowl to hold small springs, pins and such while I work.
Have a disassembly box. Nothing wastes time like trying to find a miniscule spring that leaped across the room, let alone not even knowing what happened and wondering why your gun doesn't work anymore! For disassembly I use a ten gallon acrylic aquarium turned on it's side with a cloth over it's opening. I simply place the gun inside, drop the cloth over my hands, and voila! When the spring pops out, it is caught.
Move slowly. Watch how things come apart. Remove the hammer and trigger assemblies as complete assemblies. Do not disassemble them outside of your disassembly box! If you have a digital camera, you may want to take a few photographs along the way. Get sufficient light. If necessary, buy a clamp on spotlight. If you cannot see what you are doing, you will screw it up!
Remove gunk and rust by cleaning with a solvent such as Varasol, CLP, or brake cleaner.
 Many, many problems are caused by gunk. A soak and a nylon brush usually work wonders. If you use a spray can, wear eye protection. Do not remove metal. As in medicine, the first rule is do no harm. It is OK to use a bit of steel wool or a sharpened copper penny to scrape away stubborn rust. Copper ScotchBrite works well too. At times, I will put a bit of steel wool or a sharp piece of copper in a pair of hemostats to get into tight recesses. Keep ammonia based solvents away from nickel finishes.
 It is not OK to start stoning sears. Stoning a S&W sear is a quick way to buying new parts. Be wary of case hardened parts. The case hardening is a thin layer of hardened surface. Softer metal lies underneath. I am a believer in lubrication in the right place. It is true that oil attracts dust that over time turns to gunk. The inside of a S&W revolver is pretty well protected though. The problem comes from people spraying lubricants into the gun without disassembly, creating a pathway for the dust to migrate inside the gun. Placing a dab of oil on the hammer and trigger stud before reassembly does not have the same effect, nor does a small dollop of grease on the sear.
Most problems with a Smith & Wesson revolver are caused by one of three things.
1. Rust/gunk in the lockwork.
2. A blow to part of the gun.
3. An uneducated person entering the lockwork.
If you want to prevent number three and take care of number one, then you must get the right information, the right tools, and go about things in a methodical manner to minimize error.
Labels: Gunsmithing, Smith and Wesson
posted by Xavier at 8:53 AM
![]()


17 Comments:
This is great. I am buying that book today - and the screwdriver set. Sacrificial lamb is ready to go. You wouldn't believe the condition of this hunk I found but it will make for good practice. Thanks.
I am totally incapable of taking a smith apart. A good man knows his limits...
I did get good results with an utterly filthy 686 by just taking off the grips and cylinder latch and spraying brake cleaner into every available opening. After it dried I followed by spraying in plenty of RemOil, which also dries, leaving a teflon film.
Perfect? Hardly, but it does work great now, and does not seem to be a dirt magnet.
i neither have the time nor tools nor talent... so: how often should i bring my s&w revolvers to the gunsmith for cleaning/repair?
That screwdriver link is incredible.
And this post is amazing in it's educational value.
I love the idea of a beater wheelgun to practice on...
Very nice little essay.
I have an Airlite J frame .357 that rides my belt all the time and have taken it down to the main sub assemblies for cleaning twice. That's as far as I care to go with a Smith. It gets carried everywhere and fired about twice a year, just to remind me how stout the recoil is.
The Ruger SP 101s I shoot regularly for drill are another matter. They are heavier, but also simpler, easier and, just my opinion, the lockwork is much farther toward the rugged end of things.
work in a fishbowl what a great idea
Love the safety rules... especially the trigger finger. The No. 1 cause of accidental discharges causing bodily harm to self is HOLSTERING YOUR WEAPON WITH YOUR FINGER INSIDE THE TRIGGER GUARD. Picture that in your mind... slide weapon into holster, finger on trigger, holster presses against finger, BANG. Hole in leg. Great site and that deserves a big thank-you!
Glad I finally read your article, great web space. After doing a bit of home work, I tore my 686 all the way down. Started with a good cleaning in CLP. I used a pickle jar lid and the white inside makes keeping track of parts easy. I also cleaned up any rub marks with tormek and a felt tip low speed dremel. Finished off with a Wolff Type 2 main spring. Re-lubricated, assembled. The trigger job is better than one I paid for. Thanks for all the great tips.
I'm not sure if you're into q&a, I own a mod 60 3 screw. After reading your blog for quite some time now, I decided to "crack her open" & see if I had any gunk build up. The first thing I noticed is that the front plate screw was loose, no big deal. After reassemby, I couldn't swing the cylinder out. Ater some deep thought, I loosened that front screw up a turn or so and cylinder swung freely, your thoughts?
I think it is likely two of the screws got swapped at some time. The forward screw, known as the yoke screw is just a bit shorter than the rest, or it should be. If all your screws are the same length, the yoke screw can be shortened a bit with a file. Then it can be snugged down without binding the yoke pinion.
Best regards,
Xavier
Xav, thanks for the advice on the yoke screw on my mod. 60. I had to take it down about .005" works perfect. I've found your blog to be one of extreme intrest & education. Thanks again, Barfinigate
Dear X,
For years and years, I have loved Smith and wesson guns! I own 4 currently.
I conveniced my Boss and good Friend. He should buy a S&W.
We Live in North Idaho.
Where Bears are a Big Concern, My Friend Tom and his wife ride An Atv 4x4 almost every Weekend, In Grizzle Bear Territory north of Sandpoint. Tom runs the ELKS Golf Course In Sandpoint ID.
So after much deliberation Tom went to Center sports in Post Falls Id and Buys a Brand New M29 4inch blue 44Mag.
Tom Tharp is 66 YEARS OF AGE EX Military Ranking officer.
We go out and Shoot He shoots 24 rounds of 44 special. and 12 rounds of 44 mag. and as we go to shoot more mags. after reloading. and Tom pulls the hammer back, it cycles the cylinder, but will NOT LOCK THE HAMMER BACK. The hammer will pull back 80% of the way and thats it. Gun is JUNK! Is this gun only good for 36 rounds and You throw it at the Bear?
Good Thing it happened Now and Not when Tom and his Wife really needed to use it!
I and totally discused S&W let this gun leave the Factory!!!
Tom will be taking this gun back to where it was bought. It will probably end up at S&W.
If it were mine I'd want some different!
I'm so upset at myself for convincing Tom to Buy S&W!
I'll still buy old ones.
But THE NEW SMITH and WESSON guns in My NEWLY formed opinion SUCK.
ARE THEY MADE IN MEXICO or SOUTH AMERICA? I never felt such a rough action. My thoughts right now I can not express. You couldn't print it. Have you heard of other malfunctions like this recently?
Good thing a Pissed off GRIZZ wasn't standing in front of TOM!!!
Sincerely, So embarrised,
Tod Ziebko
Xavier, I have a question about my S&W M629-1 . Its a 44 Magnum. When I shake the gun it makes a noise coming from the inside of that side cover. Like there is a loose part rattling inside there. I took the grip off, and the side cover screws. I noticed the side cover wont budge with just my fingertips. I've wrenched enough to know when to stop, expecially with an expensive piece like this one. So I put the screws back in and the grip back on. Someone on a forum said that it is probably the firing pin transfer bar. I dont know what that is. The gun functions just fine, but that noise concerns me (they also told me there shouldnt be a noise on the forum).
Xavier, my S&W 44 mag m.629-1 makes a rattling noise when i shake it. I was told on a forum that it shouldnt make any noise, and its probably the firing pin transfer bar ( i dont know what that is). I took the grip off and the side cover screws and the sidecover wouldnt budge with my fingertips. I know when to stop, so i put it back together. The gun functions fine. should i be worried about the noise?
Anon,
Without looking at the gun, I can't tell you for certain, but it is likely the transfer bar. Some of them can be a bit loose.
Get a gunsmith to shake it and give it a listen!
Thanks, I was also just told that it is a normal sound. It is the piece that prevents the gun from firing if dropped. So i'm going to leave it alone.
Thanks for posting your "Cracking Open a Smith & Wesson" article. It was just the info I needed to see. I actually just inherited a three and a half inch model 27 from my grandfather, and I'm glad I read your advice before doing exactly the kinds of things you warn against.
Post a Comment
<< Home